
These days I decided to play a little with ATmega328P microcontroller and it was a total disaster. I used a PICkit 4 programmer and MPLAB X + XC8 for the code writing and compiling. Then I came to the brilliant idea to use MCC (MPLAB Code Configurator) which supposedly is easy way to configure and use the different modules inside the chip. And after setting the wrong fuses for the clock source the chip was effectively bricked. It worked, but only if I put a watch crystal at 32.768 kHz as a clock source. And the programmer cannot communicate at that low frequency.
Why these chips are designed this way? The ICSP interface in PIC microcontrollers have a dedicated clock line, so the programming of the chip is independent of the his internal configuration. I start digging for solutions in the web and tried all sorts of things. Most recommended solution was to attach external clock source to XTAL1 pin. I have signal generator and tried this with different frequencies but without success.
Finally I found this excellent page ARDUINO-BASED AVR HIGH VOLTAGE PROGRAMMER and following the latest schematic I put the ATmega328Pchip on a breadboard and connected a million jumper wires to the Arduino. It worked and the chip was rescued. Of course I connected it again to the PICkit 4 and successfully bricked it again!
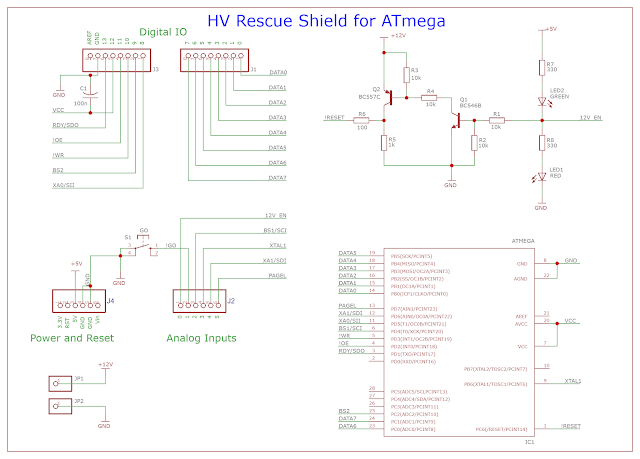
So in order to avoid dealing with jumper wires on the breadboard I get the original schematic, removed all other interfaces except the ATmega and replaced a dual PNP+NPN transistor array with discrete transistors. Also I removed the DC-DC voltage convertor because I can connect external voltage source for the 12V line. Here is the modified schematic:


It worked perfectly, the chip was saved and I am ready for another bricking :)
The board was edited with EasyEDA. You can download the project files from HERE. Inside are included Gerber files. Use these on your own responsibility. The Arduino sketch for this project you can download from the original project page HERE.
No comments:
Post a Comment